


FAQ: Premier P550
Additional product information and support:
Premier P550 Product Info
PSU Compatibility List
HiFive P550 Forum
Customer Support
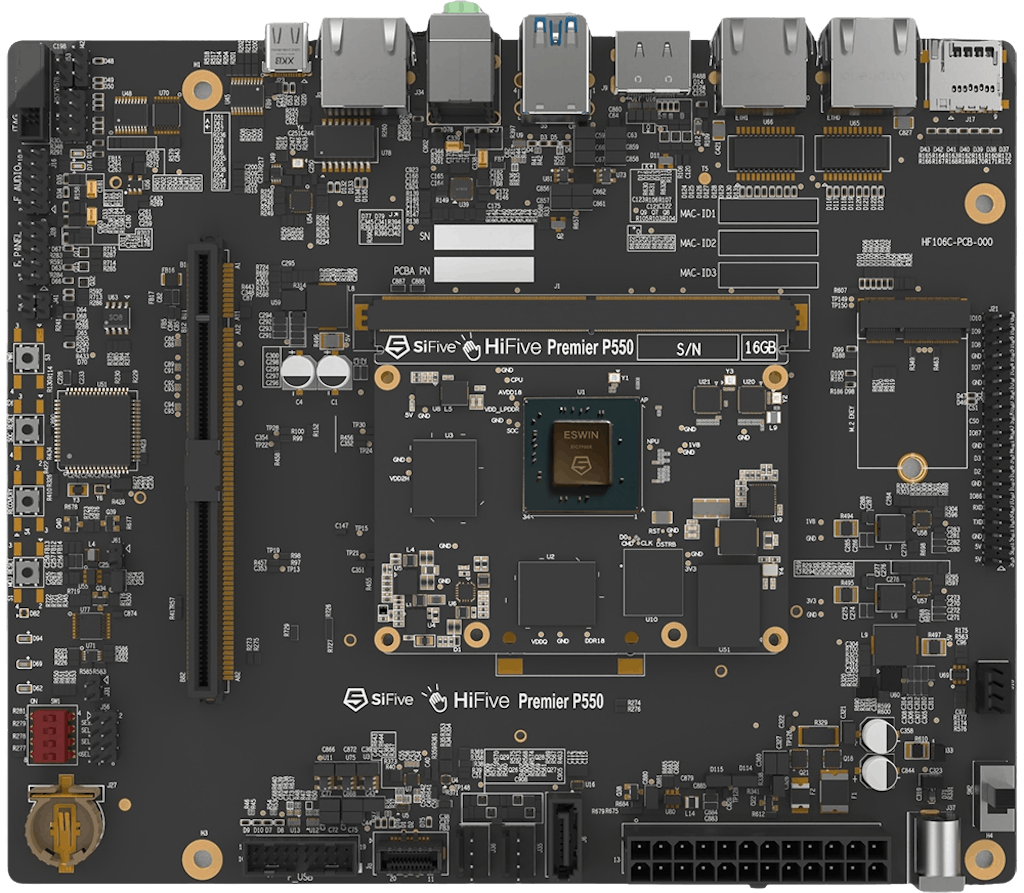
Some HiFive Premier P550 boards manufactured in the most recent batch do not have MAC-IDs programmed in their EEPROM even though the correct MAC-IDs allocated to the board are shown on the three stickers close to the two ethernet connectors.
Serial numbers of impacted carrier boards:
32GB:
SF106CKB2450000001 to SF106CKB2450000090
and
SF106CKB2451000013 to SF106CKB2451000300
16GB:
SF106CKB2451000301 to SF106CKB2451000908
There are multiple ways to check whether your board has the correct MAC-ID programmed in it:
Using command prompt after logging into the system: Use “ip a” command and check the following MAC-ID in link/ether line – you should get a MAC-address similar to what is shown below, if characters after 8c:1f are zeros it means that the board’s MAC-ID was not programmed correctly:
link/ether 8c:1f:64:13:c1:86
Using MCU interface: The MCU interface of the HiFive Premier P550 board can also be used to check the MAC-ID of the board. Access to this interface is documented in section-3 of “HF106 MCU USER MANUAL.” Note that MCU UART always enumerates one address higher on host PCs than the SOC’s terminal UART as outlined in section 7.2 of “HiFive Premier P550 Getting Started Guide.”
Open the MCU terminal and refer to section 3.1.1 of “HF106 MCU USER MANUAL”, use “ifconfig” command to check the MAC-IDs of your board.
If the 6-byte MAC-IDs identified from either of the two methods above does not match any of the addresses shown on your board’s MAC-ID stickers this means that you should update them using one of the methods listed in section “Updating the board’s MAC-ID” below.
Updating the board’s MAC-ID:
Using MCU Interface: Modifying current MAC-IDs in the HiFive Premier P550 boards is possible using the MCU interface of the HiFive Premier P550 board.
Updating the MAC-ID of Premier P550 board is documented in “HF106 MCU USER MANUAL." Refer to section 3.1.1 of this document that outlines usage of “ifconfig” and “setmac” commands. You can use the “ifconfig” to read MAC-IDs and “setmac” to write an alternate MAC-ID. If your board does not have programmed MAC-IDs that match the stickers on the carrier board next to the two ethernet ports then you can use the “setmac” command to write the correct MAC-ID to the board using the values printed on these stickers and skip using the application from ESWIN. You must fully power-cycle the Premier P550 board after making this change using either the toggle switch on the board or power-cycle the ATX power supply to ensure that all three new MAC-IDs have taken effect.
Using EsMacIdUpdateTool: This tool from ESWIN can be used to update the MAC-ID of your board if your board was in the impacted batch. ESWIN has provided Linux, Windows and MAC versions of their tool located at https://github.com/sifiveinc/hifive-premier-p550-tools. Go to folder “es-mac-id-update-tool” and refer to instructions in the sub-folder corresponding to your host PC’s operating system. You will need to download the files in the OS corresponding folders. Note that COM port identified by the tool would depend on your PC and might be different from what is shown in the instructions.
HiFive Premier P550 board has a USB2.0 port available on the Type-C connector in the rear that brings out SOC’s debug UART. The SOC provides a TTY terminal through this UART which can also be used to observe the boot progress from power-ON. Please refer to the section “Starting the Console (USB to Serial) Terminal Window” in the “Getting Started Guide” to setup your computer to connect to this UART.
HiFive Premier P550 has a PWR button (S3) as shown below that is used to power-up the board after the slide switch has been turned ON. It can also be used to power down the board by holding it down if the software hangs. Please refer to sections “HiFive Premier P550 Components Locator” and “Power, Reset and Recovery Buttons” in the “Getting Started Guide” for additional information.

Make sure the board is getting power, refer to sections “LED Description” and “Testing the Setup” in the “Getting Started Guide”. If appropriate LEDs are not lit up then the slide switch might be OFF, turn the slide switch ON (refer to section “Power Supply and ON/OFF” in the “Getting Started Guide”). If the board does not start booting on TTY terminal when the LEDs are lit and power button is pressed then check Boot SEL DIP Switch Settings of the board by referring to section “Boot Selection DIP Switch” of “Getting Started Guide”. If the DIP Switch is set correctly and the board does not start to boot on TTY terminal then try using a different power supply. If the board starts to boot but does not progress all the way up to the login prompt on the TTY terminal then boot medium might be corrupted and re-flashing the board might be required.
HiFive Premier P550 Development Board does not work from some ATX power supplies, we are investigating this further. Current recommendation is to use a different power supply. The power supplies listed in the recommended equipment list have been tested and are known to work.
HiFive Premier P550 has a SOC_RESET button (S2) that is used to reset the SOC.
Use GFx Cards recommended in approved equipment list, found in the “Getting Started Guide”, for Freedom U-SDK (Yocto). Use Ubuntu (when available).
M.2 E-Key (SDIO WiFi module) – not supported. Please refer to “Getting Started Guide”, section 1.1.
DC 12V power adapter jack (2.5mm) is for factory use. Please refer to “Getting Started Guide”, sections 1.1 and 5.1.
Please use CR1220 and refer to “Getting Started Guide”, section 6.1.3
Formatting and mounting empty space in eMMC. Use gparted to format the ~80GB empty space and it will mount automatically on the next boot cycle.
Freedom U-SDK (Yocto): Refer to “Getting Started Guide”, section 7.3.
Bare Metal support is not provided by SiFive on HiFive Premier P550 Development Platform.
The following third-party components are being used and qualified by SiFive to work out of the box with the Premier P550 board. Refer to our PSU compatibility list for more details.
ATX Power Supply:
- MSI MAG A650BN
- Seasonic SSR-850PX
- FLEX GURU 250W 80 Plus Gold Certified
- Corsair CX550 (CP-9020277-NA)
- EVGA 500BV 500W (100-BV-0500-K1)
PCIe Graphics Cards – AMD HD6000 and RX500 series cards should work with HiFive Premier P550 board. The following cards have been tested:
- VisionTek Radeon 6350 1GB DDR
- Radeon RX 550 4GB
- Radeon RX 580 8GB
M.2 Key NVMe SSD Module:
- Samsung 970 EVO Plus MZ-V7S25
USB Flash Drives:
- SanDisk Ultra Dual Drive Go USB Type- C
- Kingston DataTraveler Exodia Onyx 128GB
- Kingston DataTraveler 70 128GB Portable
- Transcend 128GB JetFlash 790 Super Speed
- HP USB 3.2 Flash Drive Type C OTG 128GB
SATA Hard drives/SSDs:
- HDD - Seagate ST500VT000
- SSD - Consistent 2.5" 256GB SSD
- SSD - Crucial BX500 240GB 3D NAND S
- SSD - ZEB-SD26 256 GB Solid State D
microSD Cards (Class 1):
- 32GB - SanDisk Ultra UHS
USB Hubs:
- VIBOTON USB Hub
- Gear Head UH2100
USB WiFi Adapters:
- tp-link Archer T3U Plus (US) – USB WiFi Adapter.
ATX Power Supply:
- FSP DAGGER PRO 650W (SFX PSU) when used to also power RX580-8GB GFx card.
Username: ubuntu
Password: ubuntu
Background
The Premier P550 requires that only one bootable storage device be connected. If multiple devices are connected at the same time, the board may sometimes pick a boot device seemingly at random when the same UUID is used.
SATA, eMMC and uSD-Card can be flashed using U-Boot
Follow the instructions in section 2 of the HiFive Premier P550 Image Update Procedure document, but use the commands listed below for your specific boot device.
If you're not sure whether the board has the bootchain corresponding to the Ubuntu image you're about to flash, you can update it using the instructions in the HiFive Premier P550 Image Update Procedure document.
Use the following commands to flash the Ubuntu image onto the desired boot device:
• SATA (using the Ubuntu image on a uSD card, i.e., mmc 1):
es_fs write mmc 1 ubuntu-24.04-preinstalled-server-riscv64.img sata 0
• SATA (using the Ubuntu image on a USB flash drive plugged into the lower USB connector on the rear of the board):
es_fs write usb 0 ubuntu-24.04-preinstalled-server-riscv64.img sata 0
• uSD card, i.e., mmc 1 (using Ubuntu image on USB flash drive plugged into the lower USB connector on the rear of the board):
es_fs write usb 0 ubuntu-24.04-preinstalled-server-riscv64.img mmc 1
There should be only one boot device on the Premier P550. Therefore, after flashing the external boot device, erase the onboard eMMC using the instructions in the HiFive Premier P550 Image Update Procedure document, section 6.1. After Ubuntu has booted, you can set up the eMMC as a 128GB drive for the user using disk partitioning tools in Ubuntu and grant full RD/WR access.
To revert back to using the eMMC as the boot device, follow the instructions in section 2 of the HiFive Premier P550 Image Update Procedure document.
NVMe and USB flash drives need to be imaged using a host PC:
The image file “ubuntu-24.04-preinstalled-server-riscv64.img” needs to be flashed to the NVMe drive or the USB flash drive using a tool such as Balena Etcher. To ensure that the system does not use the image on the eMMC, before plugging in and booting the system with either the NVMe drive or the USB flash drive, open the SOC UART terminal using Putty or other terminal emulator, power up the board, and stop the boot process when prompted to stop autoboot as shown below:
USB XHCI 1.10
scanning bus usb1@50490000 for devices... 3 USB Device(s) found
      scanning usb for storage devices... 0 Storage Device(s) found
No SATA device found!
Hit any key to stop autoboot:
Erase the onboard eMMC using instructions in the HiFive Premier P550 Image Update Procedure document, section 6.1, then power down the board by using the onboard toggle button or turning off the power supply, then plug in the NVMe drive through the PCIe adapter or USB drive in the lower rear USB connector and power up the board. After Ubuntu has booted, you can set up the eMMC as a drive for the user using disk partitioning tools in Ubuntu and grant full RD/WR access.